How to get started with the Rover
There are various projects that can be realized using the CanEduDev Rover, but the simplest way to get started is to set up the Rover like any regular radio-controlled model car. To start with, you should familiarize yourself with the Rover by understanding its different components. In the standard Rover package, the following components are included:

  • Aluminum chassis
  • Wheels
  • Brush-less electric motor
  • Brush-less electric steering servo
  • Electronic speed controller (ESC)
  • Battery holder

In addition to these components, you need a radio control kit and a 3-4 cell LiPo battery, with a charge/discharge rate of 25C or more. You also need a battery charger capable of charging LiPo batteries. These components are sold by hobby shops and can also be found on Amazon. For this example, we have used a JH-Power 3500 mAh 75C LiPo battery and the RadioLink RC6GS.

First of all, unbox your Rover and identify the different components included. The motor, ESC and the steering servo come pre-assembled on the chassis. You’ll have to install the wheels and the radio receiver yourself, and put a battery in the battery holder.

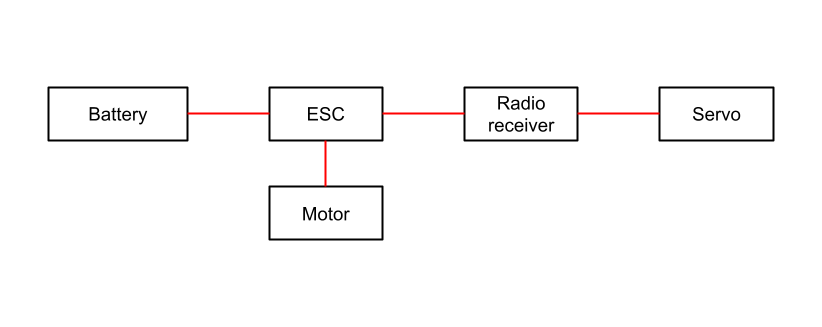
After assembling the Rover, the next step is to connect the components. First, connect the ESC to the motor, then connect the servo to channel 1 on the radio receiver, and connect the ESC to channel 2. The channels are labeled on the radio receiver. Finally, the battery should be connected to the ESC. To start the Rover, click the on/off button. The battery should be left disconnected when not in use. Of course, this is a general overview of the assembly process. For detailed instructions as well as images and videos of the assembly, see the Documentation.

Now, you should be able to take the Rover for a test drive to ensure everything works as intended. What’s next is up to your imagination. Create a battery monitoring system, a lane assist feature, or just drive for fun. Check out our electronics kit for a complete CAN system in the Rover, which you can use to integrate various components for your next project!

our other blogs

CAN Bus Simulation for Effective System Testing and Validation

Introduction At CanEduDev, we understand the critical importance of robust testing and validation in the development of modern automotive and industrial systems. Our CAN Development & Education...

read more site-logo
Video example of the Rover working seamlessly with Kvaser’s Airbridge

Below is a video example of the Rover working seamlessly with Kvaser’s Airbridge, illustrating the potential of our combined technologies. Thank you to Kvaser for inviting us to the QSR/TA confer...

read more site-logo
CanEduDev Partners with KTH and Telenor on Advanced Autonomous Driving Project

Project Overview: CanEduDev, in collaboration with the Royal Institute of Technology (KTH) and Telenor, has initiated the project "Autonomous Drive of a Minicar Using Edge Computing and 5G Communica...

read more site-logo
Introducing the Rover: Unleash Innovation, Unveil Excellence

Are you ready to revolutionize your corporate showcasing and educational experiences? Look no further than the Rover, the ultimate model car that's not just a vehicle—it's a canvas for your creati...

read more site-logo
Designing Robust CAN-Based Control Systems: A Case Study with the CanEduDev Rover

Introduction Designing a robust and efficient CAN-based control system requires careful consideration of multiple factors, including message priorities, frequency, content, and overhead. This art...

read more site-logo
Interacting with the Rover using Simulink

Simulink is a crucial software tool in the automotive realm, offering engineers a visual platform to model vehicle systems via block diagrams. Engineers leverage this versatile software to simulate an...

read more site-logo